Several smartwatch users have requested us to come up with a tutorial on how to create a personalized VXP watch face. So in this tutorial, we are going to share step by step instructions on how to create an analog VXP watch face.
Creating a VXP watch face is not that difficult; however, you need to have little patience and proper setup.
To create your own VXP face, you have to download and install the below-listed programs on your Windows computer.
Download VXP Watch Face Maker Programs
- MRE SDK (Download | Mirror)
- ADS 1.2 (Download | Mirror)
- HxD Hex Editor (Download)
- Notepad++ (Download)
- Visual Basic 2008 or later (Download)
NOTE
To avoid compilations, errors, and other problems, it is recommended to install Visual Basic 2008 full version and all the programs to C:\Program Files folder but not C:\Program Files (x86) folder.
Apart from the above programs, you need to have Adobe Photoshop installed on your computer to edit the image files.
Also, download the Resources.zip file, which contains all the necessary files to get you started to create a VXP watch face.
Once all the programs and files are downloaded and installed, we can start to create a watch face for MediaTek Smartwatch.
Things to Remember
- All the images must be in
.pngformat. - All the images must be
240x240pixels in resolution, except for the preview image, which should be150x150pixels resolution. - Image file size should be
30 KB–35 KBto avoid problems with the watch face when installing on Smartwatch. You can compress the images online using TinyPNG, Shortpixel, and OptimizePNG.
Below are the required images to create a watch face. All the images are included in the Resources zip package for reference.
- clock_bg.png – Watchface background image (240×240 pixels)
- hand.png – Hour hand (240×240 pixels)
- minute.png – Minute hand (240×240 pixels)
- second.png – Second hand (240×240 pixels)
- preview.png – Preview image of the watch face (150×150 pixels)
Once you have all the above-required images edited according to your preference, you can proceed with the below instructions to create a VXP watch face using these images.
How to Create VXP Watch Face [MediaTek Watch Face]
- First of all, open the
MRELauncher.exeprogram on your computer. - Once the program loads, click on the
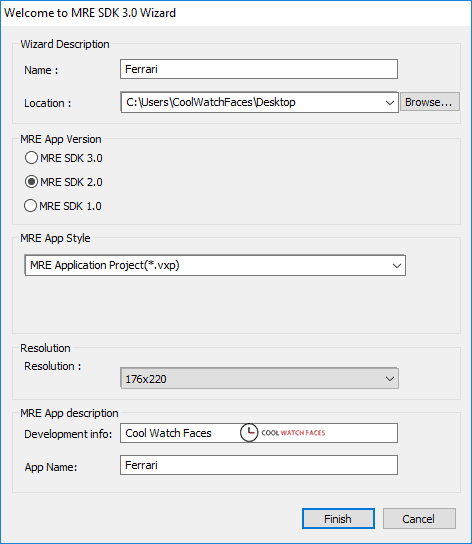
Create MRE App Projecticon to create a new project. - Now, the MRE SDK Wizard window should open. Enter the details as described below:
- In the
Namefield, enter the name that you would like to call your watch face. In our case, let’s name our watch face, Ferrari. - Now for the
Location, choose your Desktop folder. - Under
MRE App Version, choose MRE SDK 2.0. - Make sure the
MRE App Styleis MRE Application Project(*.vxp). - Under
Resolution, choose 176×220. - Now, under the
MRE App description, in theDevelopment info, enter your name (ex: Cool Watch Faces), and in theApp Name, enter the same name as you have entered in theNamefield (In our case Ferrari).
- In the
- Once you have entered all the above-required information in the MRE SDK Wizard window, click on
Finish. - Now, a folder with the name of your watch face will be created on your Desktop. In our case, the
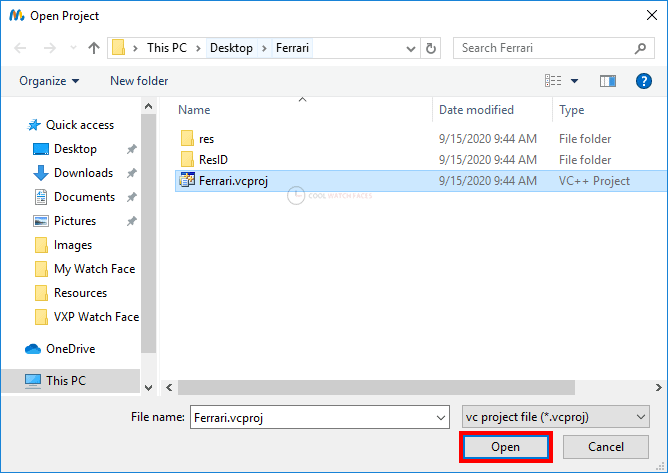
Ferrarifolder is created on the Desktop. - Go back to the MRE Launcher program and click on
Open projecticon and navigate to the Ferrari folder and openFerrari.vcprojfile. - Open the watch face folder (Ferrari) and go to config -> Default.
- Now, extract the Resources.zip file on your Desktop and open the extracted folder.
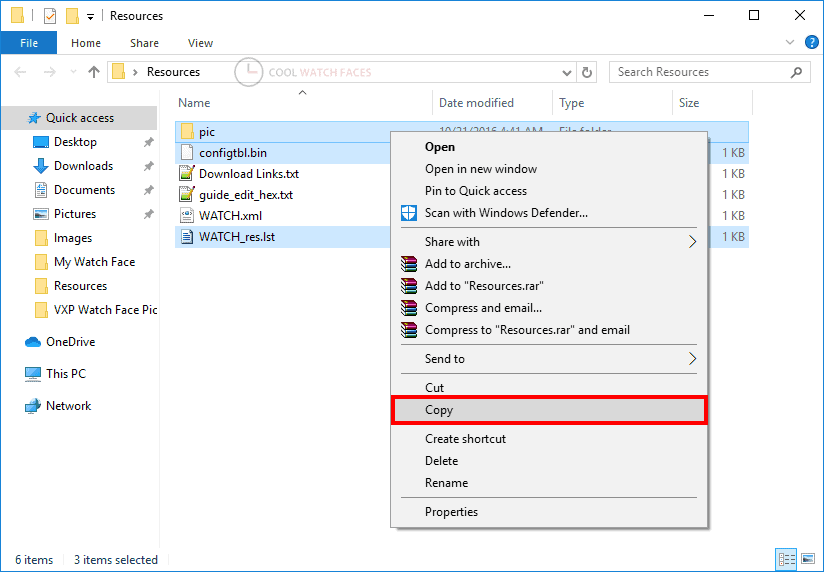
- Now, select
pic(folder),configtbl.binandWATCH_res.lstand copy the selected items to the folder which you have opened in Step #7 (Ferrari -> config -> Default). - Replace the images in the
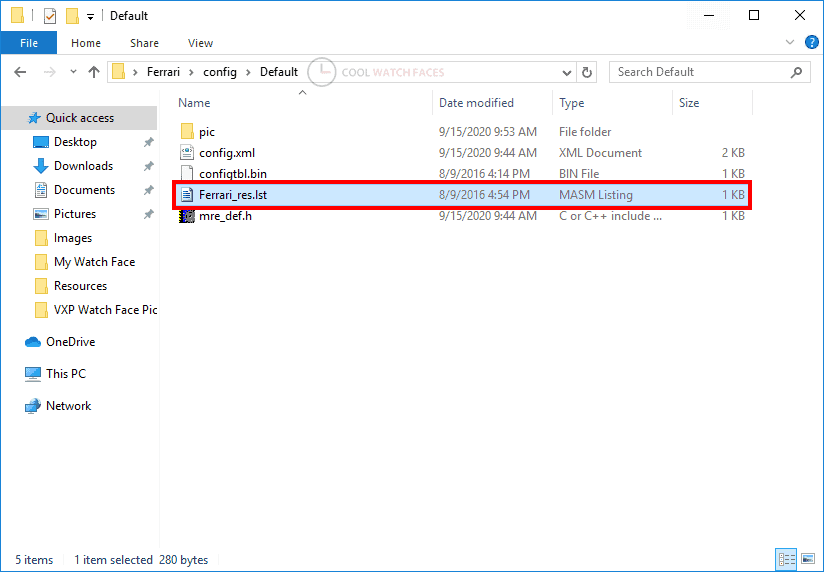
picfolder with your image files to create your VXP watch face. - Now rename
WATCH_res.lstwith your watch face name. In our case, we have to rename it asFerrari_res.lst. - Once renamed, open
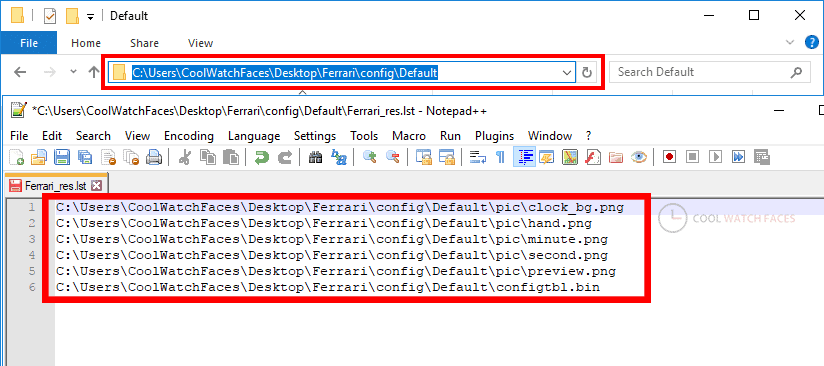
Ferrari_res.lstfile using Notepad++ and change the path for the files to your PC equivalent. You can copy the path from the Windows Explorer window by navigating toFerrari->config->Default. - Once the path for the resources is set in the
Ferrari_res.lstfile, save it and close Notepad++. - Now, go back to the MRE Launcher and click on the
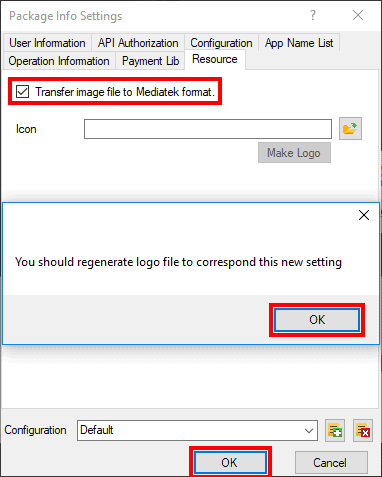
Settingsicon. - Package Info Settings window should open. Go to the
Resourcetab and enable the “Transfer image file to Mediatek format.” option and save the settings. - Now, click on the
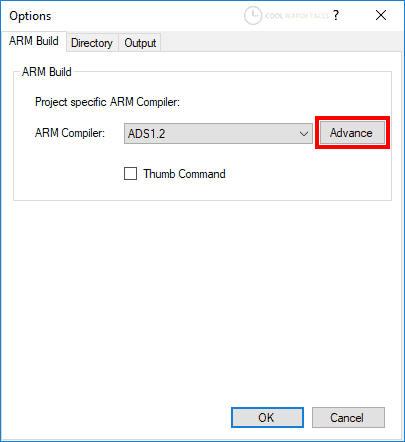
Optionsicon in MRE Launcher. - Once the Options window loads, click on the
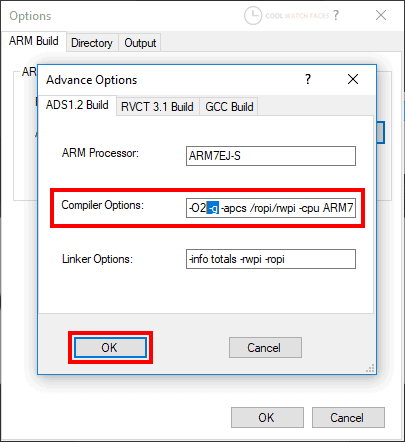
Advancebutton. - Now delete
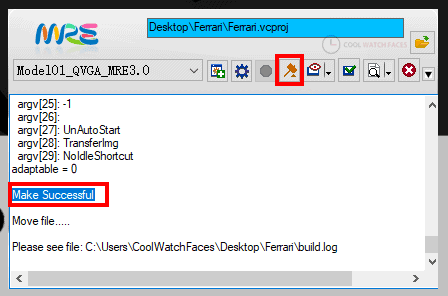
–gfrom the Compiler Options and save the settings. - Finally, click on the
Make(Hammer icon) button. - Now, the MRE Launcher program should build your VXP Watch Face using the resources you provided. Wait until you see
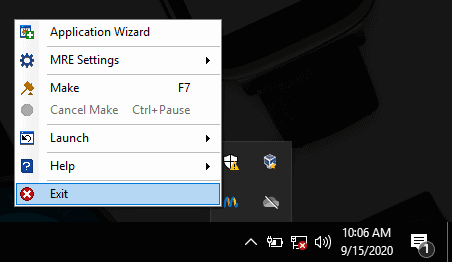
Make Successfulmessage. - Now, close the MRE Launcher program from the system tray.
- Open the watch face folder (Ferrari), and you’ll see a new folder
armcreated. Open thearmfolder and copy theDefault.vxpfile to a New Folder. - Now, copy the preview image to the New Folder from the watch face folder (Ferrari) -> config -> pic -> preview.png.
- Go back to the Resources folder and copy the
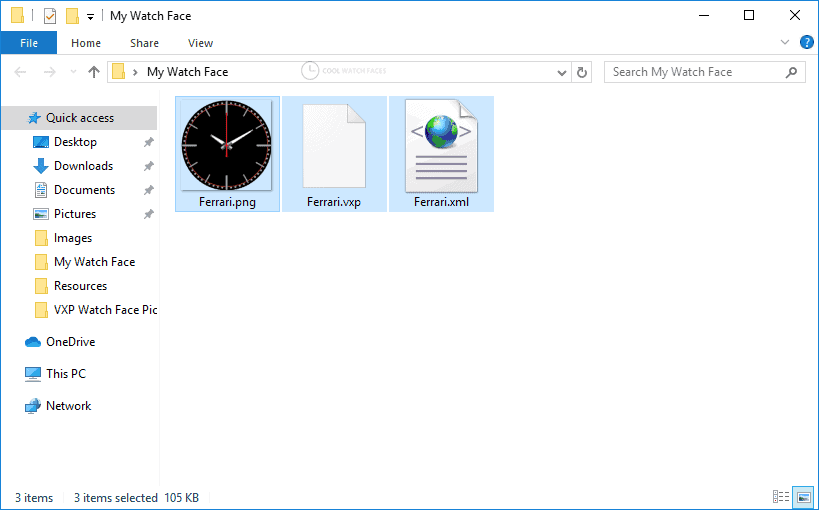
WATCH.xmlfile to your New Folder. - Now, you should have three files in your New Folder –
Default.vxp,preview.png, andWATCH.xml. - Rename all the three files to the name of your watch face. Here, for our tutorial, we’ll rename them as
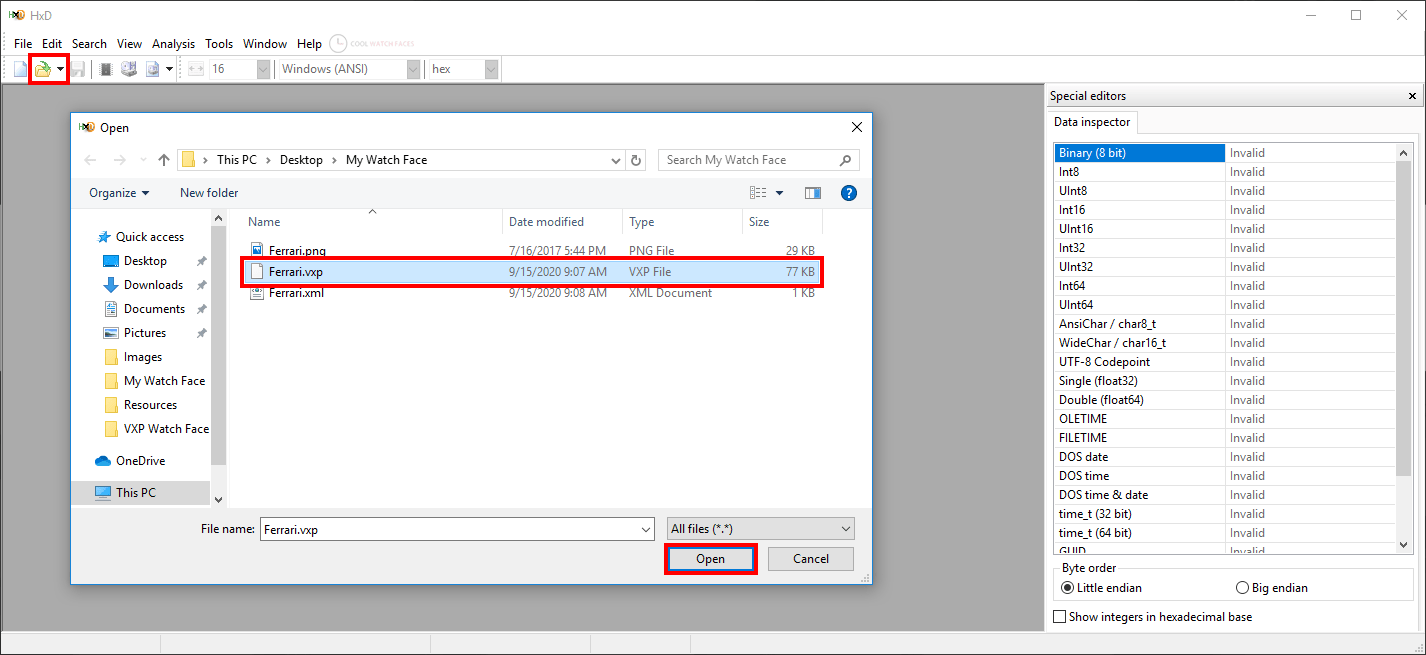
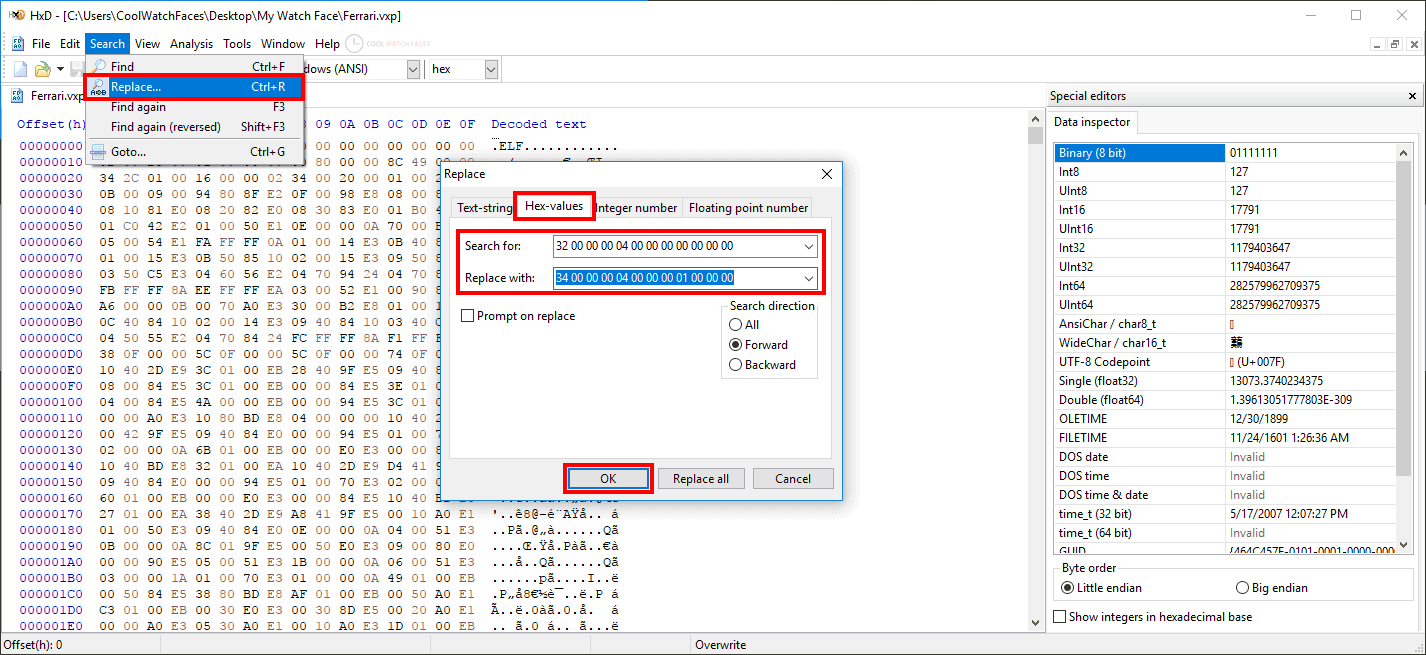
Ferrari.vxp,Ferrari.png, andFerrari.xml. - Now, open the HxD Hex Editor program and open
Ferrari.vxpfrom the New Folder. - Now, press
Ctrl+Ror click on Search -> Replace. - The search and replace window should open. Click on the
Hex-valuestab. - In the Search for field type
32 00 00 00 04 00 00 00 00 00 00 00and in the Replace with field type34 00 00 00 04 00 00 00 01 00 00 00and click on Replace all. - Now, click on the
Saveicon to save the file. - Now, we have to edit the
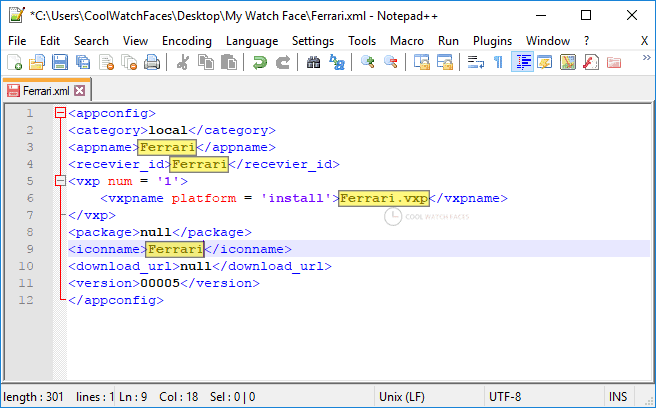
Ferrari.xmlfile to match the watch face file names and watch face name. So, open theFerrari.xmlfile with Notepad++ and change the<appname>,<receiver_id>,<vxpname>, and<iconname>tag values as shown below. - Once you have edited the
Ferrari.xmlfile, save it.
That’s it. You have all the three files that a VXP watch face require – Ferrari.vxp, Ferrari.png, and Ferrari.xml file. You can delete the Ferrari.vxp.bak file.
Now, to install your VXP face on MediaTek Smartwatch, follow the complete step by step tutorial here.
We hope that the instructions were easy to follow, and if you face any issues, then don’t forget to post them in the comment section below.
Also, don’t forget to share this tutorial with your friends on Facebook, Twitter, Pinterest, and other social media platforms.






Hi.. so when this tutorial will be published? Tnxz
Soon, within a week or two.
Hi above side instructions I followed but not rotating my watch face, my watch is w26+, not rotating my hand.png,minute.png, and also second.png please give me a solution
cant download
MRE_SDK_3.0.00.20_Normal_Eng_0.zip
ADS12.RAR
it worked 4 me after a billion attempts it worked
We’ve fixed the links. Please try downloading the files again.